Whether you're a busy professional juggling a ton of different commitments or an entrepreneur looking to maximize your productivity each day, managing your schedule efficiently is key.
That’s where a virtual assistant (VA) comes in.
These remote workers can handle your administrative tasks, keep your calendar organized, and make sure you're on top of all your appointments. But to really get the most out of their help, it's important to have easy access to your calendar.
Google Calendar and Outlook Calendar are two of the most widely used tools for organizing our schedules, appointments, and commitments. Both platforms offer robust features for sharing access to your calendar with others, including virtual assistants.
The good news is that whether you use Google Calendar or Microsoft Outlook, giving your virtual assistant access to your calendar isn’t too complicated! We will go through every step involved in sharing calendar access with your assistant. These steps can be followed to share diary access with other people as well—you just have to use their email addresses instead.
Google Calendar
Google is very popular, and its calendar has been designed for ease of use. If you’re looking to delegate Google calendar management to a virtual assistant, the good news is that sharing access is pretty straightforward. Effective schedule management involves giving access to others to view or edit the schedule, inviting others to events, and setting permissions for calendar access.
Here’s how you can do it in just a few steps:
Step one
Open your calendar by visiting google.com/calendar in your browser or opening the app on your device.
Step two
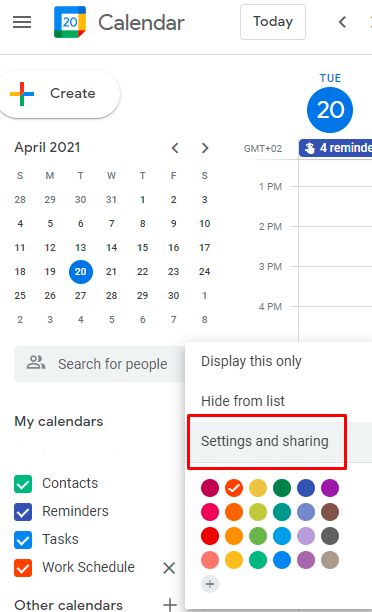
In your calendar list, situated on the left side of the page, you will see the names of all your calendars. Here, you will choose the appropriate one that needs to be shared with your assistant.
Click on the three dots that become clickable when you hover your indicator over the name of your calendar.

You will be given a few options, and you need to select ‘Settings and sharing’.
Step three
Once you’re in the settings menu, click on the relevant calendar and scroll down the page to find the ‘Share with specific people’ option. This is an essential step in managing someone's calendar effectively.
Here, you will enter your assistant’s email address so you can share access to the calendar with them.
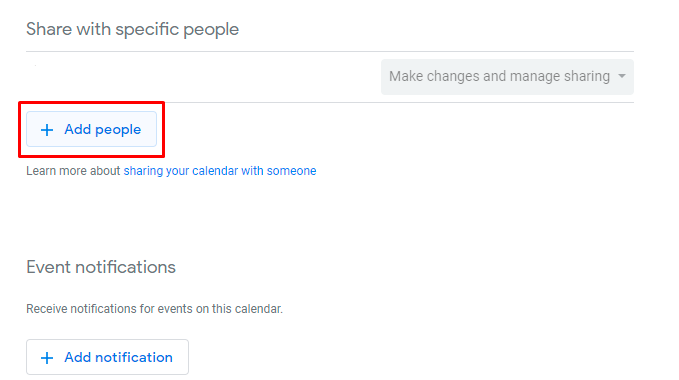
You will be given a drop-down menu that lets you choose the specific calendar permissions you want to grant.
Choose whichever option suits your needs best and select ‘Send’. That’s all you have to do—your virtual assistant will then receive an email with information and access to the calendar.

Your virtual assistant then simply needs to click on the link and then add the calendar to their own list. It won’t be added automatically, though, so just make sure you let your assistant know about this step.
Note that the permissions you allow people include the following:
- Make Changes and Manage Sharing
This setting gives your virtual assistant the rights to the calendar as if they’re the owner.
Your virtual assistant can see and change all the events marked on the calendar, even the ones that are private.
With this setting, your virtual assistant can see all the details of calendar events, but they can’t view any private event details.
- See Free/Busy Information (No Details)
If you choose this option, your assistant will be able to see the bookings on your calendar and which days are open. However, they will not be able to see any of the event’s details.
Grant access and share the link
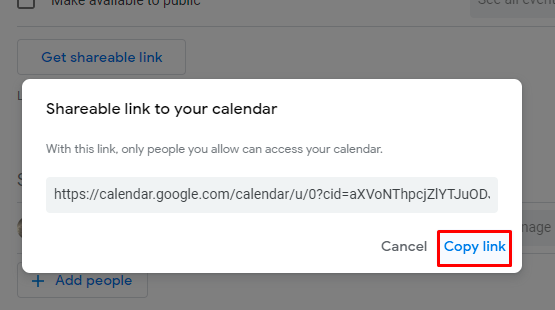
To share the link of your calendar with your assistant, you just have to go to ‘Access Permissions’ and click on ‘Get Shareable Link’.
You will then be given a URL which you should email to your assistant. They can click on the link, and they’ll be taken to it immediately.

Outlook
Sharing your calendars in Outlook.com with your assistant is just as easy as it is with Google’s calendars.
In fact, many users think it’s a little easier!
There are two methods to choose from. You can either send a link to anyone you want to share calendar access with, or you can simply share it with anyone with a Microsoft account. Keeping track of events and updates becomes seamless with these options.
The method you choose will depend on how you and your virtual assistant prefer to do things. Both work equally well.
You may create more than one permission list, and you’re allowed to remove or add people to the list as you see fit. Each list can also have different permission settings depending on what you want to share with those on the list.
If your assistant does not have a Microsoft account, they can easily create one for free.
Here are the two easy steps you have to follow to share calendar access with your assistant on Outlook.
Step one
Head over to your calendar and find the ‘Share’ button on the top right of your screen. Click on it, and a menu will pop up.

Step two
You will now enter the email address of your assistant and choose the permission you want them to have. Double-check the email address and permissions to make sure it's accurate. Once that is selected, simply click ‘Share’, and an email will be sent to your assistant.

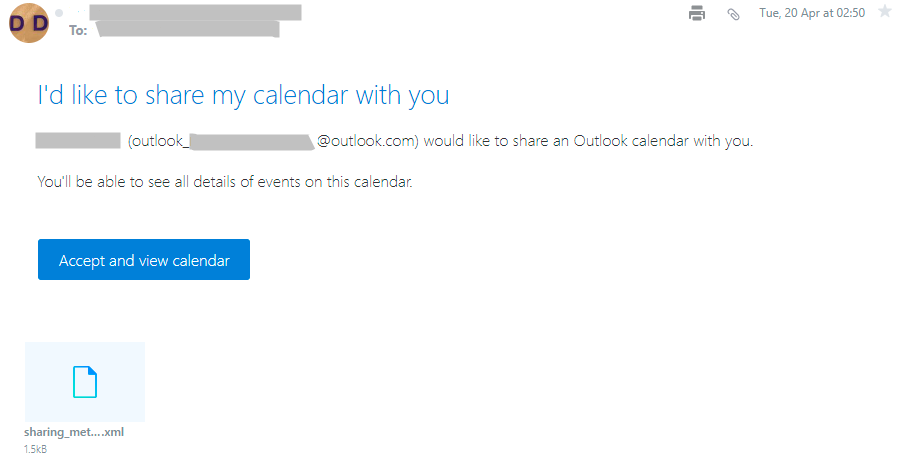
Your virtual assistant will receive an invitation to your calendar through the email that was just sent. They can click on the link and sign in to their account to see it.
What's the bottom line?
That’s it! That is all you have to do to quickly and easily set up your virtual assistant calendar management.
Sharing access to your Outlook or Google calendar with a virtual assistant can significantly streamline your workflow and enhance productivity. By following the steps outlined in this article, you can establish a seamless collaboration, making sure that your virtual assistant stays informed about your schedule and can efficiently manage appointments, meetings, and deadlines on your behalf.
Remember to prioritize security and privacy by granting specific permissions and regularly reviewing access settings. With effective calendar sharing, you can delegate tasks confidently, knowing that your virtual assistant has the necessary visibility and tools to support you successfully.

